
过去一段时间,我们团队一直在探索 AI Native 研发模式。最初的关注点是如何规范 AI Coding,实际推进后,我们发现更值得讨论的问题是:当编码的主要执行者逐渐变成 Agent,原有研发流程中的哪些环节还需要人参与?
在原有 Spec Driven Coding(以下简称 SDD)流程中,同一个模型完成一个简单需求,我需要持续参与约 3 个小时。调整工作方式后,前期需求对齐通常不到 30 分钟,Agent 在后台完成实现和代码审查,我再花 10 分钟确认关键需求点,发布测试环境后用 5 分钟验收。虽然需求的端到端交付时间不一定缩短到 45 分钟,但人的占用时间已经明显下降。
这套实践由两部分组成:使用 Matt Pocock 的 skills 完成需求对齐和任务拆分,再使用 Multica 将拆分后的任务交给不同职责的 Agent 执行。前者解决“如何把问题说清楚”,后者解决“如何让 Agent 持续工作并完成协作”。本文主要介绍我们为什么选择这两套工具,以及它们是如何衔接的。
一、原有 SDD 流程的问题
SDD 的出发点没有问题。在 AI Coding 过程中,先明确需求和约束,再让模型实现,通常比直接给出一句需求更可靠。我们遇到的问题不是 Spec 本身,而是围绕 Spec 建立的流程过长。
一套完整的 SDD 流程往往会产生多份中间文档,每个阶段还有对应的确认和审查动作。随着 AI 产出速度提升,文档数量也快速增加,人的工作逐渐从思考需求变成审查 AI 生成的过程产物。原本用于降低风险的流程,反而扩大了人需要处理的上下文。
以 Spec 审查为例。如果需求中的关键决策尚未对齐,审查当然有必要;但如果人和 AI 已经进行过充分讨论,Spec 只是对讨论结果的结构化整理,此时逐段审查的主要作用是检查模型的总结能力。对于当前能力较强的模型,这类审查的边际收益正在降低。
因此,我们开始逐个检查流程节点:这个节点是在解决真实的不确定性,还是仅仅因为旧流程要求它存在?如果 Agent 已经能够稳定完成,是否还需要人确认?
这并不意味着取消所有约束。模型执行速度越快,前期决策不清带来的返工成本越高。需要减少的是低价值流转和重复确认,而不是需求思考本身。
二、AI Coding 缺少了“边写边想”的过程
传统开发中,很多细节并不是在需求评审时一次性想清楚的。工程师在实现过程中会自然放慢速度:设计接口时发现职责不清,处理异常时补充边界条件,写测试时重新确认预期行为。编码不仅是执行,也是继续理解问题的过程。
AI Coding 压缩了实现时间,也压缩了这段思考时间。一个没有充分说明的需求交给 Agent 后,Agent 往往不会停下来等待人补齐决策,而是根据当前上下文选择一个看似合理的方向继续实现。最终结果可能在技术上完整,却偏离了真正的需求意图。
这也是我们对 Humans steer,Agents execute 的理解:人不需要持续指挥 Agent 如何写每一段代码,但必须负责需求意图、关键决策和验收标准。只有先把这些内容说清楚,后续执行才适合交给 Agent。
三、用 Matt Pocock Skills 完成需求对齐和拆分
Matt Pocock Skills 是一组面向AI Coding的 Agent Skills。
这套仓库有两个比较鲜明的设计取向。第一,Skill 尽量保持小而聚焦,例如需求访谈、生成 Spec、拆分 Ticket、TDD 和 Code Review 分别由不同 Skill 负责;第二,Skill 之间可以组合,但不试图用一套重型流程接管所有项目。相比用大量提示词规定模型每一步如何思考,这种方式更依赖模型已经具备的通用能力,只在关键位置补充工作纪律。
Matt 在工作流演示中给出了一条从需求讨论到代码实现的路径:
/grill-with-docs → /to-spec → /to-tickets → /implement
这几个 Skill 并不是相互独立的。前一步产生的对话和产物,会成为后一步的输入:grill-with-docs 负责消除决策不确定性,to-spec 负责整理共识,to-tickets 负责形成 Agent 可领取的工作单元,implement 再执行单个 Spec 或 Ticket。我们主要保留了前三个环节,并用 Multica 中的多角色协作替换原本的执行阶段。
(一)grill-with-docs:提前暴露不确定性
grill-with-docs 的核心动作是让 AI 围绕需求持续提问。它不会立即生成方案,而是识别当前描述中仍然存在的不确定性,例如用户行为、异常处理、数据边界和技术取舍,再要求人逐项做出决定。
Skill 原文对它的定义是:
Original: “A relentless interview to sharpen a plan or design, which also creates docs (ADR’s and glossary) as we go.”
翻译:通过持续追问完善方案或设计,并在过程中同步沉淀 ADR 和术语表。
查看 grill-with-docs
---
name: grill-with-docs
description: A relentless interview to sharpen a plan or design, which also creates docs (ADR's and glossary) as we go.
disable-model-invocation: true
---

Run a `/grilling` session, using the `/domain-modeling` skill.
这个过程的产物不只是更多文字,而是一个更明确的语义空间:我们要解决什么问题,哪些行为已经确定,哪些内容不在本次范围内,以及实现过程中应当遵循哪些关键决策。
- 有种最明显的情况是,你知道这个需求应该这么做,你知道这个细节应该这样实现,你知道这个场景通常如何设计,但你在长期的经验中把它当作默认常识而忽略了,因此在写需求文档时根本没有覆盖到跟提及到。而你所认知的事实,对大模型来说并非是理所当然的事实。他实际操作中就必定会偏离你的期待。你自己在行业中的公共知识并不等于大模型熟知的公共知识。
- 当太多的细节偏离了你的期待,你有再好的harness,再好的loop,都失去了意义。除了头脑风暴跟拷问skill,其它所有skill都几乎无法增加新的输入,无法将输入细节细化。
我们会把主要的人力投入放在这一阶段。因为需求意图和关键决策无法由 Agent 代替我们做出,一旦这里对齐,后面的整理和执行就可以减少人工介入。
如果某个问题仅靠讨论难以判断,例如交互形态或者状态模型是否合理,可以临时使用 prototype skill 生成一个可运行、可丢弃的原型。Prototype 的目的只是回答当前决策问题,并不是所有需求的固定步骤。
(二)to-spec:整理已经达成的共识
to-spec 不会重新进行一轮需求访谈,而是把已有讨论整理为一份 Spec,包括问题、方案、用户行为、实现决策、测试决策和非目标。
它的原文定义直接强调了这一点:
Original: “No interview, just synthesis of what you’ve already discussed.”
翻译:不再进行访谈,只整理已经讨论清楚的内容。
查看 to-spec
---
name: to-spec
description: Turn the current conversation into a spec and publish it to the project issue tracker — no interview, just synthesis of what you've already discussed.
disable-model-invocation: true
---

This skill takes the current conversation context and codebase understanding and produces a spec (you may know this document as a PRD). Do NOT interview the user — just synthesize what you already know.

The issue tracker and triage label vocabulary should have been provided to you — run `/setup-matt-pocock-skills` if not.

## Process

1. Explore the repo to understand the current state of the codebase, if you haven't already. Use the project's domain glossary vocabulary throughout the spec, and respect any ADRs in the area you're touching.

2. Sketch out the seams at which you're going to test the feature. Existing seams should be preferred to new ones. Use the highest seam possible. If new seams are needed, propose them at the highest point you can. The fewer seams across the codebase, the better - the ideal number is one.

Check with the user that these seams match their expectations.

3. Write the spec using the template below, then publish it to the project issue tracker. Apply the `ready-for-agent` triage label - no need for additional triage.

<spec-template>

## Problem Statement

The problem that the user is facing, from the user's perspective.

## Solution

The solution to the problem, from the user's perspective.

## User Stories

A LONG, numbered list of user stories. Each user story should be in the format of:

1. As an <actor>, I want a <feature>, so that <benefit>

<user-story-example>
1. As a mobile bank customer, I want to see balance on my accounts, so that I can make better informed decisions about my spending
</user-story-example>

This list of user stories should be extremely extensive and cover all aspects of the feature.

## Implementation Decisions

A list of implementation decisions that were made. This can include:

- The modules that will be built/modified
- The interfaces of those modules that will be modified
- Technical clarifications from the developer
- Architectural decisions
- Schema changes
- API contracts
- Specific interactions

Do NOT include specific file paths or code snippets. They may end up being outdated very quickly.

Exception: if a prototype produced a snippet that encodes a decision more precisely than prose can (state machine, reducer, schema, type shape), inline it within the relevant decision and note briefly that it came from a prototype. Trim to the decision-rich parts — not a working demo, just the important bits.

## Testing Decisions

A list of testing decisions that were made. Include:

- A description of what makes a good test (only test external behavior, not implementation details)
- Which modules will be tested
- Prior art for the tests (i.e. similar types of tests in the codebase)

## Out of Scope

A description of the things that are out of scope for this spec.

## Further Notes

Any further notes about the feature.

</spec-template>
这里有一个重要前提:主要决策应当已经在 grill-with-docs 阶段完成。Spec 是后续 Agent 共享的需求基线,不是另一轮需要从头讨论的方案设计。基于这个前提,我们不会默认要求人再做一次完整审查,只会在必要时检查少量高风险决策是否被准确记录。
(三)to-tickets:将需求拆成可并行的垂直切片
to-tickets 会把 Spec 拆成多个可以独立实现和验证的 ticket。它强调垂直切片:一个 ticket 应当交付一条完整的功能路径,而不是把前端、后端和数据库分别拆成三个水平任务。
Skill 原文使用了 tracer bullet 来描述这种拆分方式:
Original: “Break any plan, spec, or conversation into a set of tracer-bullet tickets, each declaring its blocking edges.”
翻译:将方案、Spec 或讨论拆成一组能够贯穿各层、独立验证的 Tickets,并让每个 Ticket 显式声明阻塞关系。
查看 to-tickets
---
name: to-tickets
description: Break a plan, spec, or the current conversation into a set of tracer-bullet tickets, each declaring its blocking edges, published to the configured tracker — edges as text in one file per ticket locally, or native blocking links on a real tracker.
disable-model-invocation: true
---

# To Tickets

Break a plan, spec, or conversation into a set of **tickets** — tracer-bullet vertical slices, each declaring the tickets that **block** it.

The issue tracker and triage label vocabulary should have been provided to you — run `/setup-matt-pocock-skills` if not.

## Process

### 1. Gather context

Work from whatever is already in the conversation context. If the user passes a reference (a spec path, an issue number or URL) as an argument, fetch it and read its full body and comments.

### 2. Explore the codebase (optional)

If you have not already explored the codebase, do so to understand the current state of the code. Ticket titles and descriptions should use the project's domain glossary vocabulary, and respect ADRs in the area you're touching.

Look for opportunities to prefactor the code to make the implementation easier. "Make the change easy, then make the easy change."

### 3. Draft vertical slices

Break the work into **tracer bullet** tickets.

<vertical-slice-rules>

- Each slice cuts a narrow but COMPLETE path through every layer (schema, API, UI, tests) — vertical, NOT a horizontal slice of one layer
- A completed slice is demoable or verifiable on its own
- Each slice is sized to fit in a single fresh context window
- Any prefactoring should be done first

</vertical-slice-rules>

Give each ticket its **blocking edges** — the other tickets that must complete before it can start. A ticket with no blockers can start immediately.

**Wide refactors are the exception to vertical slicing.** A **wide refactor** is one mechanical change — rename a column, retype a shared symbol — whose **blast radius** fans across the whole codebase, so a single edit breaks thousands of call sites at once and no vertical slice can land green. Don't force it into a tracer bullet; sequence it as **expand–contract**. First expand: add the new form beside the old so nothing breaks. Then migrate the call sites over in batches sized by blast radius (per package, per directory), each batch its own ticket blocked by the expand, keeping CI green batch to batch because the old form still exists. Finally contract: delete the old form once no caller remains, in a ticket blocked by every migrate batch. When even the batches can't stay green alone, keep the sequence but let them share an integration branch that all block a final integrate-and-verify ticket — green is promised only there.

### 4. Quiz the user

Present the proposed breakdown as a numbered list. For each ticket, show:

- **Title**: short descriptive name
- **Blocked by**: which other tickets (if any) must complete first
- **What it delivers**: the end-to-end behaviour this ticket makes work

Ask the user:

- Does the granularity feel right? (too coarse / too fine)
- Are the blocking edges correct — does each ticket only depend on tickets that genuinely gate it?
- Should any tickets be merged or split further?

Iterate until the user approves the breakdown.

### 5. Publish the tickets to the configured tracker

Publish the approved tickets. **How** depends on the tracker `/setup-matt-pocock-skills` configured — the tickets are the same either way, only the shape of the blocking edges changes:

- **Local files** → write one file per ticket under `.scratch/<feature-slug>/issues/<NN>-<slug>.md`, numbered from `01` in dependency order (blockers first). Each file's "Blocked by" lists the numbers/titles it depends on. Use the per-ticket file template below — one ticket per file, never a single combined file.
- **A real issue tracker (GitHub, Linear, …)** → publish one issue per ticket in dependency order (blockers first) so each ticket's blocking edges can reference real identifiers. Use the platform's native blocking / sub-issue relationship where it has one; otherwise set each ticket's "Blocked by" to the blocking issues. Apply the `ready-for-agent` triage label unless instructed otherwise — the tickets are agent-grabbable by construction.

Work the **frontier**: any ticket whose blockers are all done. For a purely linear chain that means top to bottom.

Do NOT close or modify any parent issue.

<local-ticket-template>

# <NN> — <Ticket title>

**What to build:** the end-to-end behaviour this ticket makes work, from the user's perspective — not a layer-by-layer implementation list.

**Blocked by:** the numbers/titles of the tickets that gate this one, or "None — can start immediately".

**Status:** ready-for-agent

- [ ] Acceptance criterion 1
- [ ] Acceptance criterion 2

</local-ticket-template>

<issue-template>

## Parent

A reference to the parent issue on the tracker (if the source was an existing issue, otherwise omit this section).

## What to build

The end-to-end behaviour this ticket makes work, from the user's perspective — not layer-by-layer implementation.

## Acceptance criteria

- [ ] Criterion 1
- [ ] Criterion 2

## Blocked by

- A reference to each blocking ticket, or "None — can start immediately".

</issue-template>

In either form, avoid specific file paths or code snippets — they go stale fast. Exception: if a prototype produced a snippet that encodes a decision more precisely than prose can (state machine, reducer, schema, type shape), inline it and note briefly that it came from a prototype. Trim to the decision-rich parts — not a working demo, just the important bits.

Work the frontier one ticket at a time with `/implement`, clearing context between tickets.
垂直切片有两个直接收益。第一,每个 ticket 都可以按照用户行为独立验证;第二,不同 ticket 之间的耦合更低,更适合由多个 Agent 并行实现。
切片之后仍然可能存在依赖关系。例如基础能力完成后,多个上层功能才能同时开始。to-tickets 会为每个 ticket 标明 blocking edges,这些 tickets 最终组成一个 DAG。同一阶段中已经解除阻塞的 tickets 可以并行执行,存在依赖的 tickets 则顺序推进。
到这里,我们已经得到一份对齐后的 Spec 和一组适合 Agent 执行的 tickets。Matt 原始流程的下一步是 implement:
Original: “Implement a piece of work based on a spec or set of tickets.”
翻译:根据一份 Spec 或一组 Tickets 完成实现。
这个 Skill 会在预先确定的测试边界上按需调用 TDD,完成后再调用 Code Review Skill。我们的实践没有直接沿用这一段,而是把 tickets 交给 Multica,由多个独立 Agent 完成执行和审查。
四、为什么需要 Multica
需求拆分完成后,我们还缺少一个适合 Agent 持续工作的任务平台。
公司内部的需求管理平台 OneTeam 诞生于传统研发模式。需求的状态设计、分配方式和流转动作,默认操作者都是人。即使通过 MCP 让 Agent 能够读写需求,也只是增加了一个 AI 访问入口,并没有改变平台的基本协作模型:仍然需要人领取任务、推动状态并协调下一个处理者。
在调研 Helio、Coze、Raft 等产品时,我们观察到一个共同方向:人和 Agent 开始进入同一个 workspace。Agent 不再是聊天窗口中的临时工具,而是拥有持续身份的协作者,可以接收任务、使用运行环境、汇报进度并交付结果。
Multica 就是这类面向 Human + Agent 团队的开源协作平台。它不是新的 Coding Agent,也不提供自己的基础模型,更接近一套面向 Agent 的任务管理平台和执行控制面:上层用 Issue、看板和评论承载协作,下层连接已经安装好的 Claude Code、Codex 等 Coding Agent CLI,并负责触发和跟踪它们的执行。
理解 Multica,需要先区分其中几个核心对象:
| 对象 | 作用 |
|---|---|
| Workspace | 团队的协作边界,内部包含成员、Agent、Issue 和配置 |
| Issue | 核心任务单元,可以分配给人,也可以分配给 Agent |
| Agent | 一个配置好的工作者身份,包含名称、Instructions、模型参数、Skills 和绑定的 Runtime |
| Runtime | Agent 实际执行任务的计算环境,例如某位研发的电脑或内部服务器 |
| Daemon | 运行在 Runtime 上的后台进程,负责领取任务并启动 Coding Agent CLI |
| Squad | 由多个 Agent 组成的稳定团队,通过 Leader Agent 进行任务路由 |
这里的 Agent 不是模型的同义词。它更像一个配置完整的虚拟同事:可以给 Builder 绑定擅长实现的模型和 Instructions,给 Reviewer 绑定另一种模型及审查规则,再让它们运行在不同的 Runtime 上。Agent 会出现在 Issue 的 assignee 列表中,也可以评论、更新任务状态并接收后续消息。
(一)Issue 如何触发一次 Agent 执行
Multica 采用控制面与执行环境分离的架构。Web 前端、后端服务和 PostgreSQL 负责保存 Workspace、Issue、Agent 配置及任务状态;真正的代码执行不发生在 Web 服务中,而是发生在绑定的 Runtime 上。
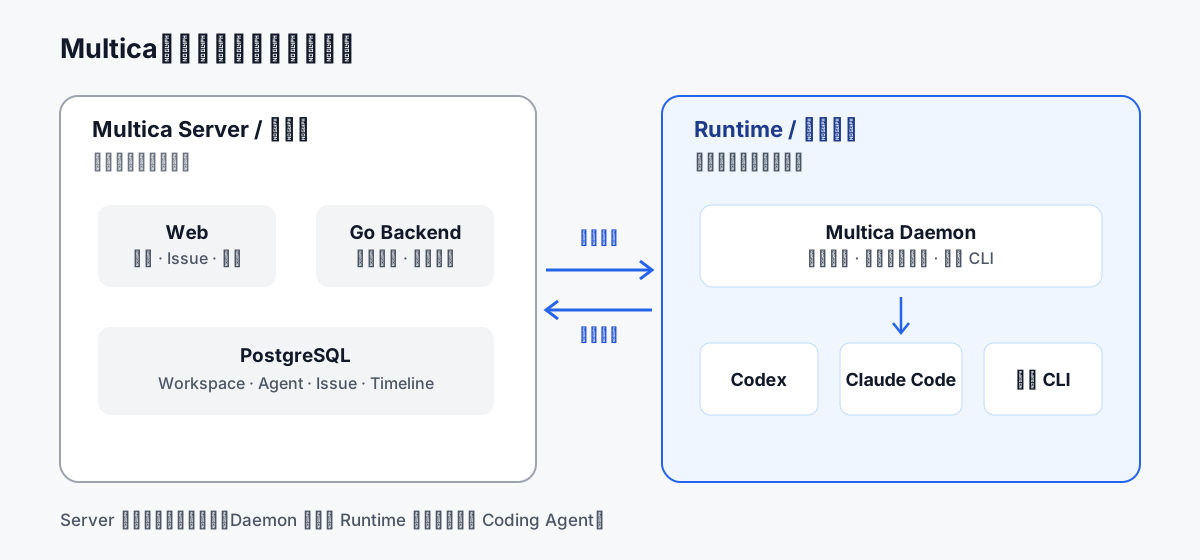
一次典型执行过程如下:
- 人或其他 Agent 将 Issue 分配给某个 Agent,后端生成一条待执行任务。
- Runtime 上的 Multica Daemon 领取任务,并读取该 Agent 的 Instructions、Skills、环境变量和 CLI 配置。
- Daemon 在对应工作目录中启动 Claude Code、Codex 等 Coding Agent CLI,将 Issue 内容作为任务上下文。
- 执行过程中的输出、状态和结果被同步回 Multica,团队可以在 Issue 时间线中查看。
- 同一个 Agent 再次处理同一个 Issue 时,可以恢复已有会话和工作目录,继续上一次工作,而不是从零开始。
因此,Multica 解决的重点并不是“让模型更会写代码”,而是让 Agent 的执行从一次性的终端会话变成可以被分配、追踪和恢复的团队任务。人不必复制 Prompt、盯住某个终端,也不必手动记录当前任务应该交给谁。
(二)Self-host 与数据边界
我们选择 Multica,除了它的任务模型适合 Agent 协作,还有一个现实原因:Multica 开源并支持 self-host,可以满足内部代码和数据的安全要求。后续软工也有团队部署了内部实例,我们的实践也迁移到了这套环境。
Self-host 部署包含 Next.js 前端、Go 后端和 PostgreSQL 数据库。Coding Agent 则由团队机器或内部服务器上的 Daemon 启动。也就是说,任务管理数据和执行控制面可以部署在公司内部,代码实际在哪台机器上执行也可以通过 Runtime 明确控制,而不需要把整个执行环境托管给 Multica Cloud。
Matt Pocock Skills 和 Multica 在这里形成了比较自然的分工:skills 负责把一个模糊需求转化为高质量 tickets,Multica 负责让这些 tickets 脱离人的持续操作,在多个 Agent 之间执行和流转。
五、两套工具如何衔接
目前的完整流程可以分为两个阶段:
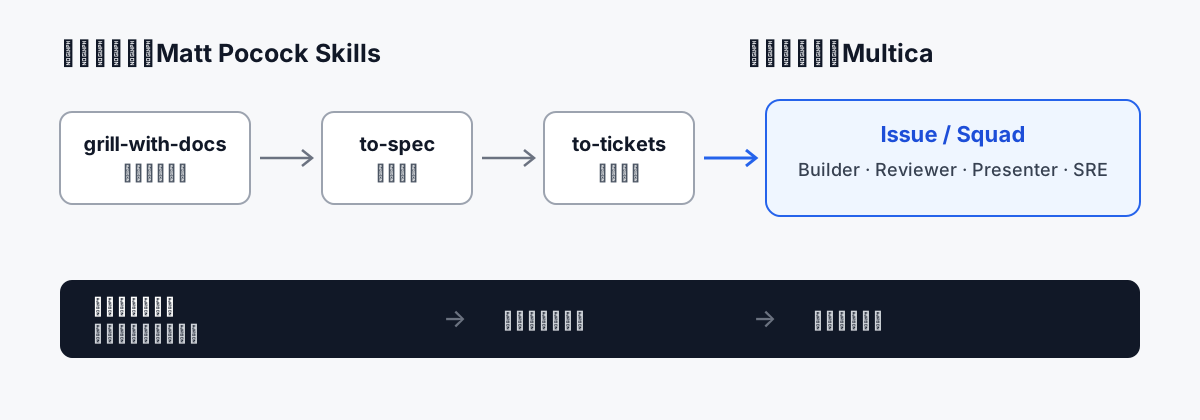
- 本地决策阶段:人和 AI 使用
grill-with-docs对齐需求,通过to-spec固化共识,再通过to-tickets完成垂直切片和依赖分析。 - Multica 执行阶段:将 tickets 同步为 issues,根据依赖关系分配给单个 Agent 或 squad,由 Agent 完成实现、独立审查、结果展示和环境发布。
在 Multica 中,我们配置了五类 Agent 角色:
| 角色 | 当前职责 |
|---|---|
| Builder | 根据 issue 完成代码实现,不审查自己的实现 |
| Reviewer | 在独立上下文中进行 code review;不通过时留下评论并将 issue 退回 Builder |
| Presenter | 对照 Spec 关键点和代码生成 HTML 报告,展示实现情况与风险 |
| SRE | 触发 CI/CD,将通过审查的版本发布到测试环境 |
| Orchestrator | 在多 issue 场景中管理 DAG,当前一阶段完成后分配下一阶段的 issues |
(一)Builder 与 Reviewer 使用独立上下文
Matt 的 implement skill 会在实现结束后调用 code review skill。我们的 Builder 没有沿用这一设计,因为同一个 Agent 在同一上下文中审查自己的实现,很容易延续实现阶段已经形成的假设,难以真正发现方向性问题。
因此,Builder 只负责实现,Reviewer 使用一份全新的上下文进行审查。我们还会为 Reviewer 配置与 Builder 不同的模型,利用模型之间的能力差异补充审查视角。Reviewer 如果发现问题,会在 issue 中给出具体评论,再将任务重新分配给 Builder。修复完成后,issue 再次进入 Reviewer。
这一步的目标不是增加一个形式化节点,而是用上下文隔离替代“自问自查”。实现和审查由两个独立角色承担,职责和判断依据都更加明确。
(二)单 issue 与多 issue 使用不同路径
如果一个需求只对应一个 issue,我们会直接分配给 Builder。实现完成后,issue 按 Builder → Reviewer → Presenter 流转。审查结果确认后,再由 SRE 发布测试环境。这个场景不会唤醒 Orchestrator,因为不存在需要编排的依赖关系。
如果一个需求包含多个 issues,则整体分配给 squad。Orchestrator 读取 tickets 之间的 blocking edges,先分配 DAG 中当前没有阻塞的 issues。同一阶段的任务可以由多个 Builder 并行执行;当这一阶段全部完成后,Orchestrator 再释放下一阶段的任务。
这种区分避免了为了流程统一而引入无意义的 Agent 调用。简单任务走最短路径,只有存在真实依赖时才增加编排角色。
(三)当前编排仍然依赖 Agent Instructions
Multica 目前没有提供适合我们场景的固定模型编排能力。单 issue 流程写在各个 Agent 的 instructions 中:每个角色除了知道自己要做什么,也知道完成后应当把 issue 交给谁。多 issue 流程则主要写在 Orchestrator 的 instructions 中,由它判断当前 stage 是否完成,以及下一批 issues 是否可以开始。
这种方式依赖模型的指令遵循,确定性不如程序化状态机;但它也保留了根据 issue 实际情况调整流程的能力。随着模型能力提升,是否值得把所有流转固化成脚本,目前并没有明确答案。我们的判断是先让流程在真实需求中运行,再识别哪些约束必须程序化,而不是一开始就设计一套完整的编排系统。
六、实践效果与尚未解决的问题
从目前的使用结果看,这套组合最明显的收益不是 Agent 写代码更快,而是人可以退出大部分执行过程。
在原有 SDD 流程中,一个简单需求会占用我约 3 个小时,其中相当一部分时间用于确认中间文档、推动流程和持续关注实现。现在,人主要参与三个节点:前期需求对齐、实现后的关键点确认、测试环境验收,累计通常不超过 45 分钟。Agent 的后台执行、返工和 CI 时间仍然存在,因此这组数据衡量的是人的占用时间,而不是端到端交付时长。
当前还有两个问题正在探索。
第一个问题是 Presenter 的定位。AI 提高代码产出后,Code Review 很容易成为新的瓶颈。如果继续要求人逐行阅读所有 Agent 生成的代码,编码阶段释放的时间会被下游审查重新占满。我们希望 Presenter 能把人的审查对象从完整代码,逐步转向几个更关键的问题:Spec 中的关键行为是否实现、对应证据是什么、当前还有哪些风险。现有 HTML 报告已经可以辅助检查,但还不能替代传统 Code Review。
第二个问题是编排的确定性。完全依赖 instructions,可能因为模型理解差异出现流转偏差;完全使用固定脚本,又可能限制 Agent 对异常情况的处理能力。哪些节点需要硬约束,哪些节点可以继续由模型判断,还需要更多需求来验证。
七、总结
这次实践并不是要建立另一套更完整的 SDD。相反,我们希望随着模型能力变化,持续删除已经没有必要的流程节点,只保留真正影响结果的决策和约束。
Matt Pocock Skills 帮助我们把人的判断集中在执行前:通过提问暴露不确定性,将共识整理为 Spec,再拆成可以独立验证和并行执行的 tickets。Multica 则让这些 tickets 成为 Agent 可以领取、执行和流转的真实任务,并通过不同角色和独立上下文完成协作。
现阶段,人仍然负责需求意图、关键决策和最终验收;实现、审查、任务流转和环境发布,则逐步交给 Agent。对我们来说,Humans steer,Agents execute 的重点不只是扩大 Agent 的执行范围,更是重新界定人应该在哪些节点投入注意力。